Prediction#
There are atleast four ways to make predictions with DeepForest.
Predict an image using model.predict_image. The entire image is passed to the model.
Predict a large number, which we call a ‘tile’, using model.predict_tile. The tile is cut into smaller windows and each window is predicted.
Predict a directory of images using a csv file using model.predict_file. Each unique image listed in a csv file is predicted.
Predict a batch of images using model.predict_batch. This is useful when you have an existing dataloader from outside DeepForest that yields data in batches.
In general, during inference, for large images it is most common to use predict_tile.
Predict an image using the command line#
We provide a basic utility script to run a prediction task with the ability to save and/or plot outputs. This command is called deepforest predict and is included as part of the standard installation. You can run the command without any arguments, or the --help flag to check that it’s available. The script will run in tiled prediction mode by default.
Note
If you are using uv to manage your Python environment, remember to prefix these commands with uv run, for example: uv run deepforest predict.
usage: deepforest predict [-h] [-o OUTPUT] [--plot] [--root-dir ROOT_DIR] [--mode {single,tile,csv}] [input]

positional arguments:
  input                 Path to input image or CSV file (optional if specified in config)

options:
  -h, --help            show this help message and exit
  -o OUTPUT, --output OUTPUT
                        Path to save prediction results CSV
  --plot                Visualize predictions
  --root-dir ROOT_DIR   Root directory containing images when input is a CSV file. Defaults to CSV directory if not specified.
  --mode {single,tile,csv}
                        Prediction mode: 'single' for single image, 'tile' for tiled image prediction, 'csv' for batch prediction from CSV file. Defaults to 'single'.

Any remaining arguments <key>=<value> will be passed to Hydra to override the current config.
You should provide an input path, to an image you’d like predictions for. If you want to save the results as a CSV file, use -o. If you want to plot the results in a GUI, you can use the --plot flag.
The CLI allows access to the three prediction modes that DeepForest supports. If you’re predicting from a CSV file with a list of images, you need to also provide a root_dir so DeepForest knows where they’re located. If you don’t provide this, DeepForest will check config.validation.root_dir.
Any and all other configuration options can be provided afterwards, for example if you wanted to change the patch size:
deepforest predict ./path/to/your/image.tif -o results.csv patch_size=250 patch_overlap=0.1
We use Hydra for configuration management, and the format for specifying predictions is a space-separated list of <key>=<value>s, like the example above.
To see the default configuration and to check what options you can set, you can run deepforest --show-config flag (no other options are required).
Predict an image using model.predict_image#
This is most commonly used for small images or pre-cropped windows of large tiles. Passing a large tile to predict_image will lead to poor performance, use predict_tile.
from deepforest import get_data
from deepforest import main
from deepforest.visualize import plot_results

# Initialize the model class
model = main.deepforest()

# Load a pretrained tree detection model from Hugging Face
model.load_model(model_name="weecology/deepforest-tree", revision="main")

sample_image_path = get_data("OSBS_029.png")
img = model.predict_image(path=sample_image_path)
plot_results(img)
Predict a tile using model.predict_tile#
Large tiles covering wide geographic extents cannot fit into memory during prediction and would yield poor results due to the density of bounding boxes. Often provided as geospatial .tif files, remote sensing data is best suited for the predict_tile function, which splits the tile into overlapping windows, performs prediction on each of the windows, and then reassembles the resulting annotations.
Let’s show an example with a small image. For larger images, patch_size should be increased.
from deepforest import main
from deepforest import get_data
from deepforest.visualize import plot_results
import matplotlib.pyplot as plt

# Initialize the model class
model = main.deepforest()

# Load a pretrained tree detection model from Hugging Face
model.load_model(model_name="weecology/deepforest-tree", revision="main")

# Predict on large geospatial tiles using overlapping windows
path = get_data("OSBS_029.tif")
predicted_raster = model.predict_tile(path, patch_size=300, patch_overlap=0.25)
plot_results(predicted_raster)
dataloader-strategy#
An optional argument to predict_tile allows the user to control how to scale prediction of tiles and how the windows are created within tiles.
prediction_single = m.predict_tile(path=path, patch_size=300, dataloader_strategy="single")
The dataloader_strategy parameter has three options:
single: Loads the entire image into CPU memory and passes individual windows to GPU.
batch: Loads the entire image into GPU memory and creates views of the image as batches. Requires the entire tile to fit into GPU memory. CPU parallelization is possible for loading images.
window: Loads only the desired window of the image from the raster dataset. Most memory efficient option, but cannot parallelize across windows due to Python’s Global Interpreter Lock, workers must be set to 0.
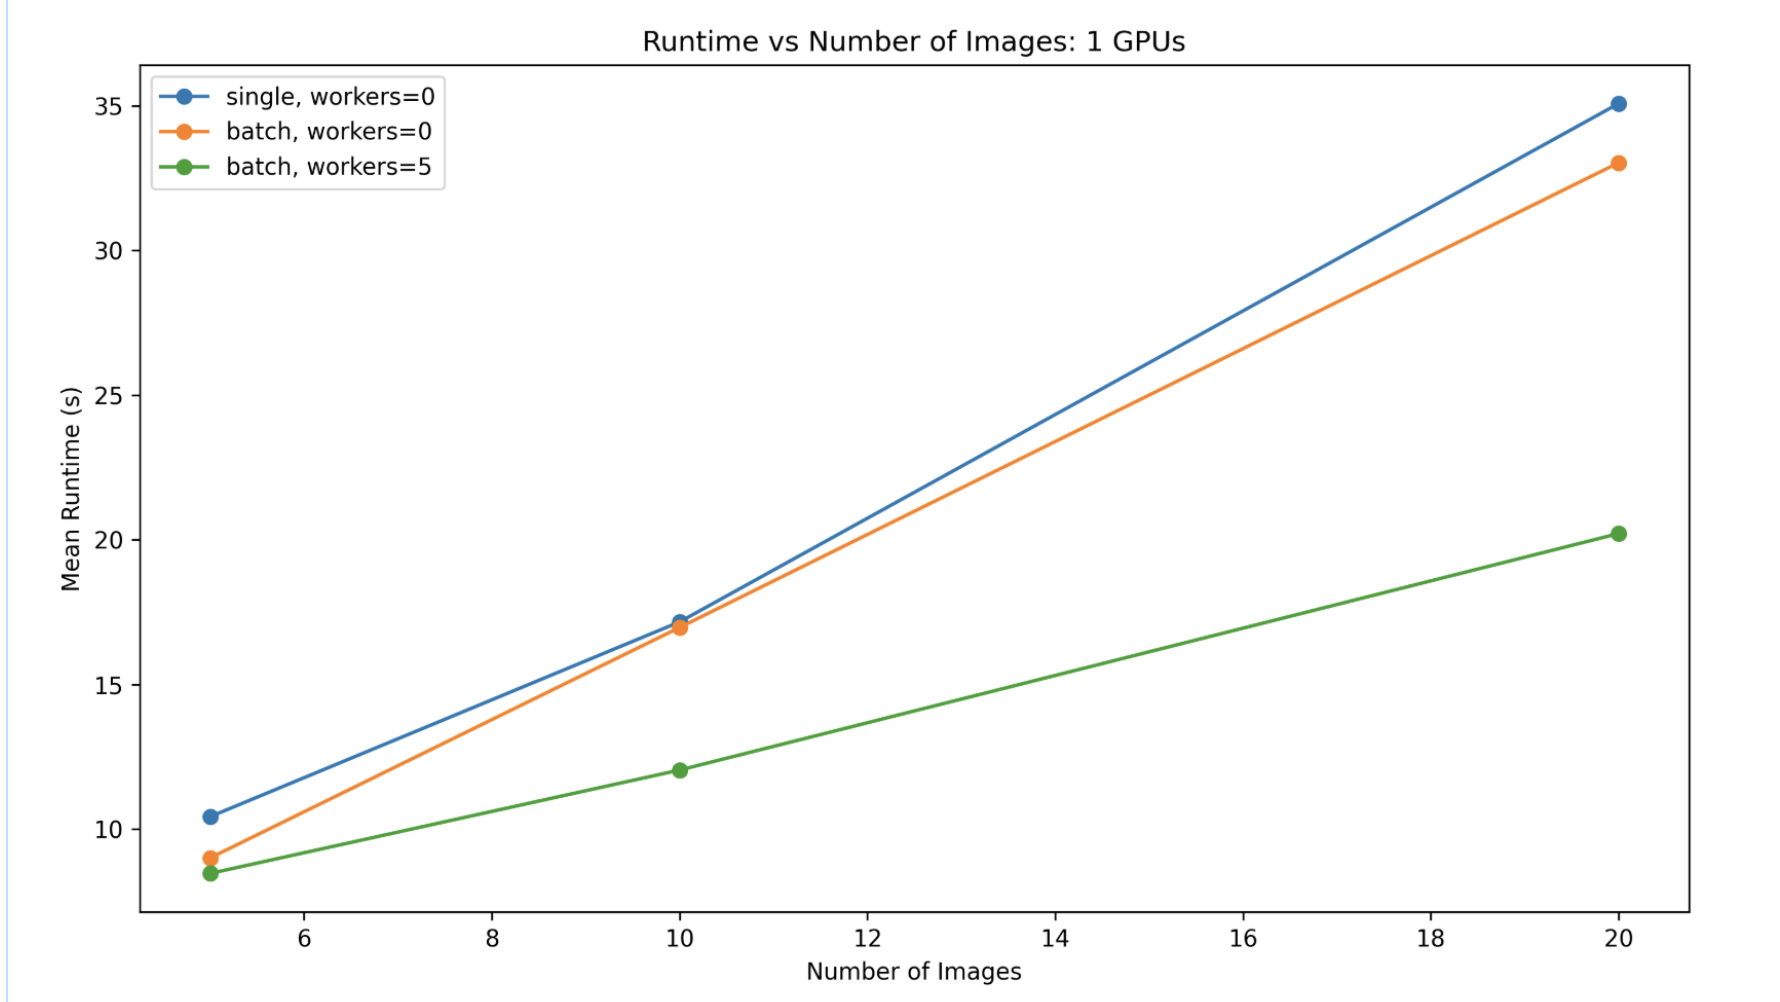
The image shows that the speed of the predict_tile function is related to the strategy, the number of images, and the number of dataloader workers, which is set in the deepforest config file.
Patch Size#
The predict_tile function is sensitive to patch_size, especially when using the prebuilt model on new data. We encourage users to experiment with various patch sizes. For 0.1m data, 400-800px per window is appropriate, but it will depend on the density of tree plots. For coarser resolution tiles, >800px patch sizes have been effective.
Predict a directory of using a csv file using model.predict_file#
For a list of images with annotations in a csv file, the predict_file function will return a dataframe with the predicted bounding boxes for each image as a single dataframe. This is useful for making predictions on a large number of images that have ground truth annotations.
csv_file = get_data("OSBS_029.csv")
original_file = pd.read_csv(csv_file)
df = m.predict_file(csv_file, root_dir=os.path.dirname(csv_file))
>>> print(df.head())
         xmin        ymin        xmax        ymax  label     score    image_path                                           geometry
0  330.080566  342.662140  373.715454  391.686005      0  0.802979  OSBS_029.tif  POLYGON ((373.715 342.662, 373.715 391.686, 33...
1  216.171234  206.591583  248.594879  242.545593      0  0.778803  OSBS_029.tif  POLYGON ((248.595 206.592, 248.595 242.546, 21...
2  325.359222   44.049034  363.431244   82.248329      0  0.751573  OSBS_029.tif  POLYGON ((363.431 44.049, 363.431 82.248, 325....
3  261.008606  238.633163  296.410034  276.705475      0  0.748605  OSBS_029.tif  POLYGON ((296.410 238.633, 296.410 276.705, 26...
4  173.029999    0.000000  229.023438   33.749977      0  0.738210  OSBS_029.tif  POLYGON ((229.023 0.000, 229.023 33.750, 173.0...
Predict a batch of images using model.predict_batch#
For existing dataloaders, the predict_batch function will return a list of dataframes, one for each batch. This is more efficient than using predict_image since multiple images can be processed in a single forward pass.
from deepforest.datasets.training import BoxDataset
from torch.utils.data import DataLoader
import numpy as np
from PIL import Image

path = get_data("OSBS_029.tif")
tile = np.array(Image.open(path))
ds = BoxDataset(tile=tile, patch_overlap=0.1, patch_size=100)
dl = DataLoader(ds, batch_size=3)

# Perform prediction
predictions = []
for batch in dl:
    prediction = m.predict_batch(batch)
    predictions.append(prediction)